An example of what you’re looking for is a useful tool for a teacher trying to guide learners through a task. After all, it’s a brave person who follows a recipe without a photo of what the dish should look like at the end (note: I found this fact that there is a direct correlation between number of photos and cookbook sales very exciting).
Sometimes that modelling is ‘live’ where you write, draw or create in front of the class, and sometimes it’s done in true ‘Blue Peter Presenter’ style, and you can deliver the classic line “and here is one I made earlier” (second note: if that reference means nothing to you, please take a moment to watch this delightful montage).
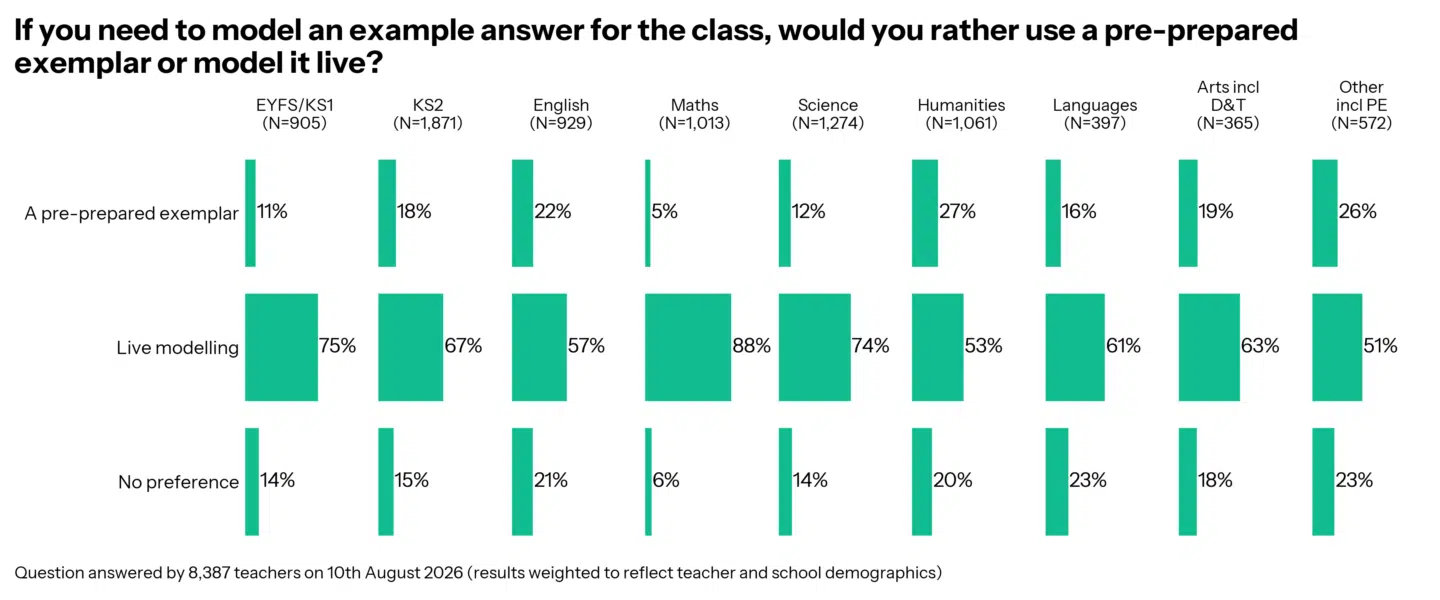
Do some subjects or key stages lend themselves more naturally to live or pre-prepared modelling? Possibly. 88% of maths teachers prefer live modelling, as do 75% of EYFS/KS1 teachers, whereas only 53% of humanities teachers said the same. And when you consider the sort of modelling done in essay-based subjects, that is understandable; longer answers can be harder to think up on the spot.
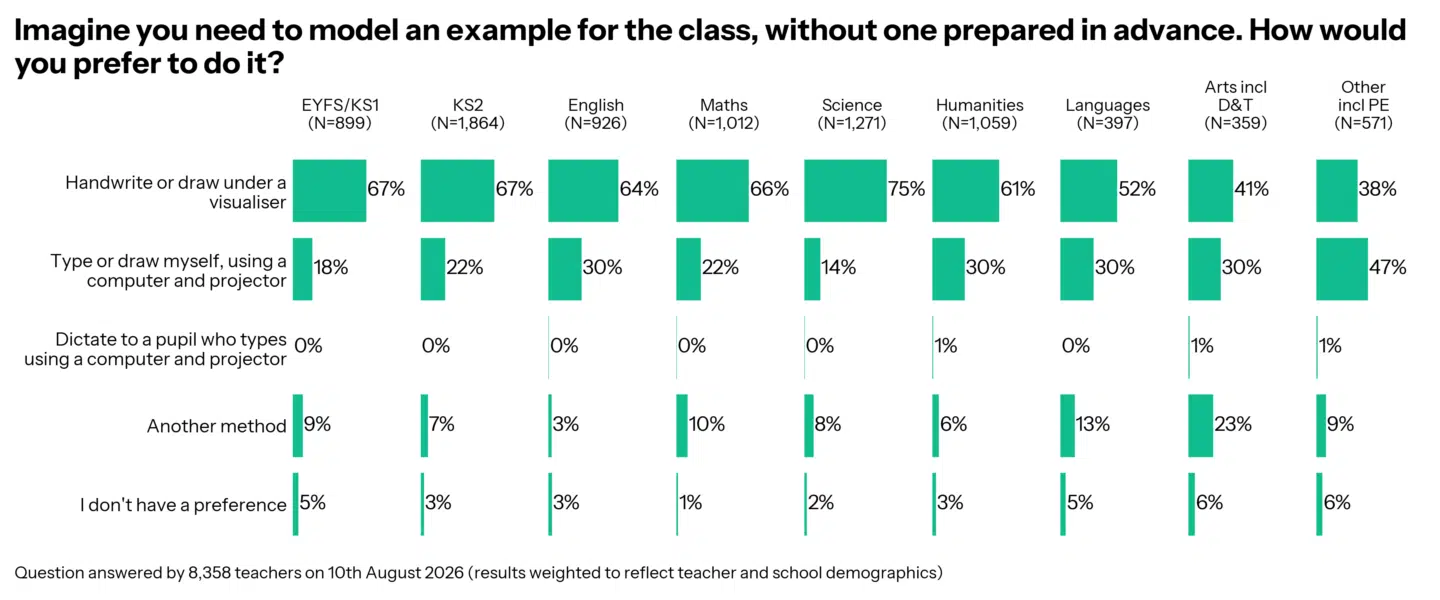
When live modelling happens, there is a variety of ways a teacher can share their model. But is there a preferred approach? In almost every subject, the top choice was to use a visualiser: 75% of science teachers; 67% of EYFS/KS1 and KS2 teachers; 66% of maths teachers.
We asked Tappers for their best tips for modelling, and a stonking 2,882 teachers wrote in to share their advice. We grouped together tips for live modelling and then tips for using pre-prepared examples. Here is a selection of some of the great pieces of advice shared:
Top 5 Tips for Live Modelling
- Handwrite live using the same books, paper, and tools as the students. Rather than projecting on a generic screen, do your work under a visualiser on the exact same worksheet, squared maths paper, or exercise book that the students have. This removes barriers to success because students can see the exact layout, margins, and presentation standards expected on their own pages.
- Narrate your metacognitive “thinking process” as you write. Live modelling is not just about demonstrating a method; it is about showing students how an expert thinks. “Think aloud” to explain why you are choosing a specific word, why you are starting a calculation in a certain column, or why you are disregarding a particular option.
- Deliberately make mistakes, edit, and self-correct in real time. Use “necessary imperfections” to normalise struggle and build a healthy “culture of error”. Intentionally write a clunky sentence, make a maths error, or cross something out to show students that first drafts are never perfect, and model how to actively proofread and fix mistakes.
- Incorporate student suggestions, but filter them selectively. Build engagement by turning the live model into a collaborative exercise. Ask the class for vocabulary ideas or have them suggest the next logical step. However, be highly selective; if you take mediocre or incorrect suggestions without adapting them, the final model can easily lose focus.
- Enforce a strict “pens down” rule and model at a very slow pace. Never let students write, draw, or try to take notes while you are actively live-modelling. Go much slower than you think you need to. Forcing students to purely listen and watch prevents cognitive overload and stops modelling from turning into passive, “glorified copying”.
Top 5 Tips for Pre-Prepared Examples
- Keep your pre-prepared model stashed at your side as a personal “crib sheet”. If you are live-modelling a challenging topic, write out a perfect version beforehand and keep it on your desk just out of the visualiser’s shot. This acts as a cognitive crutch for you, freeing up your working memory to focus entirely on scanning the classroom, managing behaviour, and delivering a crisp explanation.
- Use pre-prepared examples specifically when introducing new or highly complex concepts. When students are encountering a difficult threshold concept for the first time, a flawless pre-prepared model is highly effective. This ensures you do not accidentally introduce confusing complications or errors too early in the learning sequence.
- Compare your pre-prepared “model of excellence” (WAGOLL) directly against a mediocre one or a “non-example”. Displaying a pre-prepared perfect answer side-by-side with a mediocre response or one stashed with common misconceptions is incredibly powerful. Have students dissect both against the success criteria so they can clearly identify what makes a top-tier answer superior.
- Prepare complex, vocabulary-heavy, or grammar-dense blocks of writing in advance. If you are trying to model high-level essay writing or complex primary-school grammar, trying to conjure it on the spot can lead to rambling. Preparing these detailed passages in advance ensures you hit every target vocabulary word and success criterion perfectly.
- If using pre-prepared slides, animate them to reveal information line-by-line. Do not display a completed, static model all at once, as students will simply tune out. If you must use digital slides, use animations to reveal the model step-by-step, explaining the rationale behind each line before moving on.
Modelling – what next?
Modelling was one of the most requested topics when we asked teachers if they wanted to use Tapp findings for their INSET. Do you have other questions about modelling that Teacher Tapp could help with? Let us know by writing in to England@teachertapp.co.uk 📧.